 |

Overview
This guide explains how to set up a Defect template in RDrive using two Computations to automatically determine the Assigned Team and Due By Date. The first Computation uses the selected List 2 value to determine the appropriate Assigned Team. The second Computation uses the Created Date and Priority to calculate the Due By Date. This setup helps standardize Defect assignment and due dates without requiring users to manually select the team or calculate the due date.
- Purpose: To demonstrate how to configure fields and Computations to automatically determine the Assigned Team and Due By Date in a Defect template.
- Who It’s For: Company Admins, Project Admins, and users responsible for setting up or maintaining Defect templates.
Prerequisites:
• Access to the Defect template Wizard.
• Basic understanding of Computation fields.
• The required List and Team List fields have been created or are available in the template.
TABLE OF CONTENTS
- Overview
- Step-by-Step Instructions
- Best Practices
- FAQs & Troubleshooting
- Template
Step-by-Step Instructions
✅ Step 1: Set Up the Fields
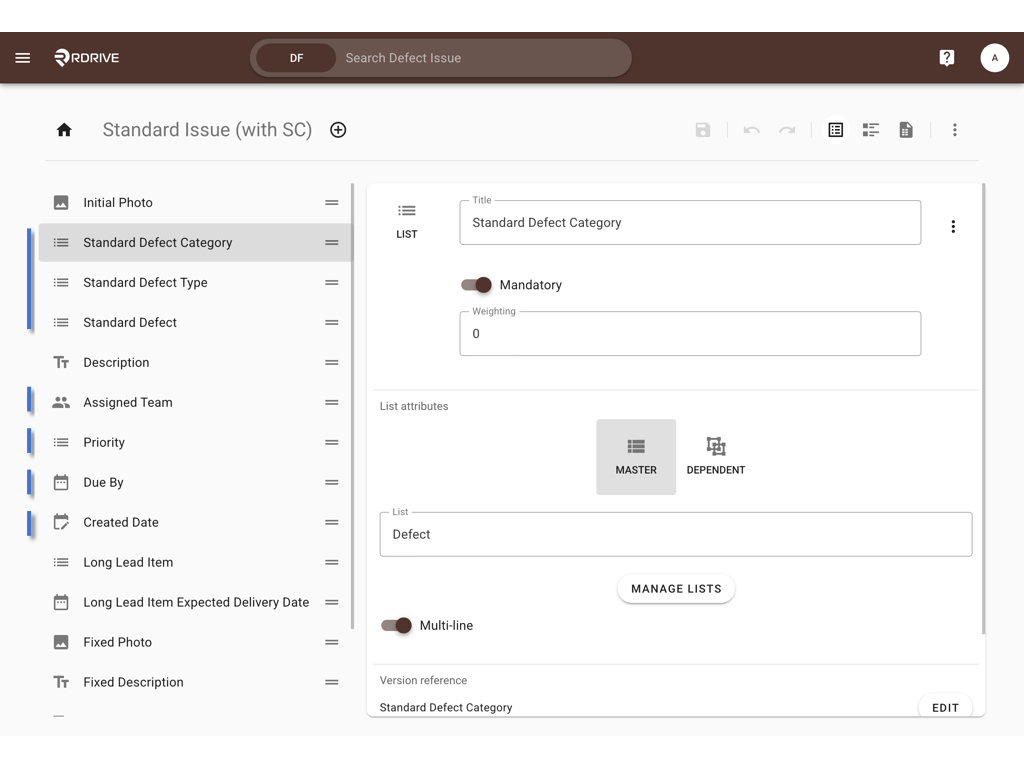
Open the Defect template in the Wizard and configure the required fields.
Add the List Fields
Add the required List fields.
If the List structure contains 3 tiers, create 3 List fields, with each field representing one tier.
For example:
| Field | Purpose |
|---|---|
| List 1 | First-tier selection |
| List 2 | Second-tier selection |
| List 3 | Third-tier selection |
In this practice, the List 2 field is used as the input for the first Computation.
Add the Team Field
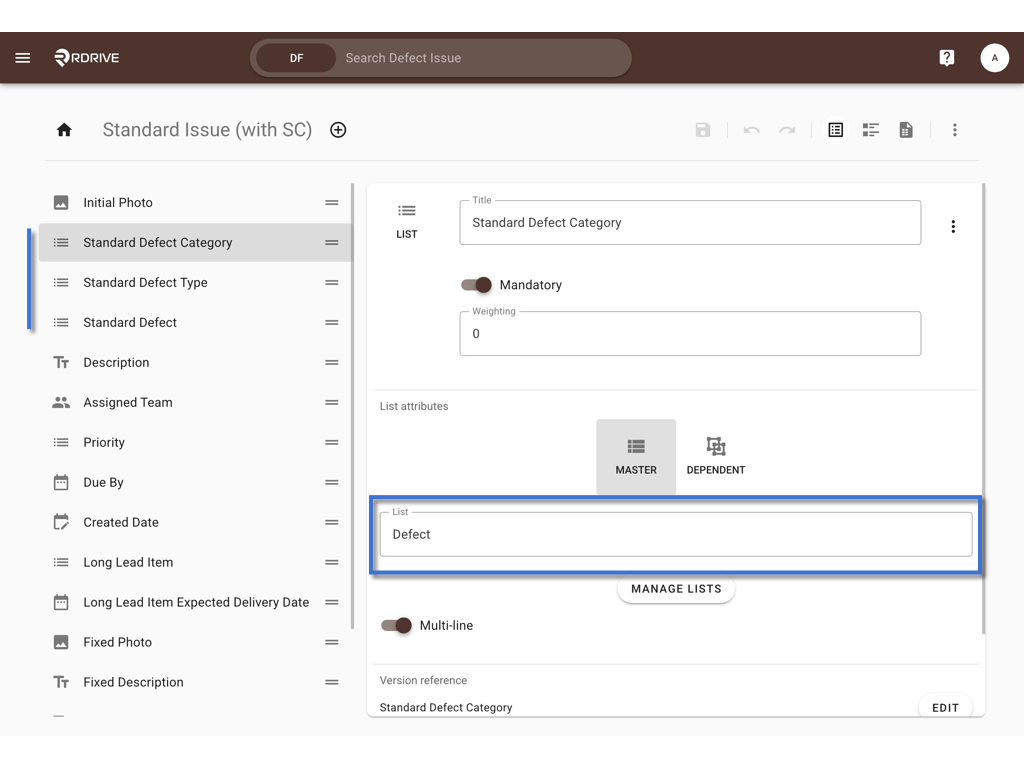
Add a Team field to store the team returned by the first Computation.
For example:
Assigned Team → Output
Important: The Computation must use the Team ID, not the team name. The Team ID is used internally to identify the team, while RDrive automatically displays the corresponding team name in the Team field.
Add the Priority Field
Add a Priority field.
This field will be used as an input for the second Computation.
Priority → Input
Add the Due By Date Field
Add a Due By Date field.
This field will be populated by the second Computation.
Due By Date → Output
Use the Created Date
The Created Date will be used as an input for the second Computation.
For detailed instructions on how to set up an Issue template, please refer to “Design an Issue Record/Report Template.”
✅ Step 2: Set Up Computation 1 — List 2 to Assigned Team
The first Computation determines the Assigned Team based on the value selected in the {Standard Defect Type} field.
In this example, the List 2 field ({Standard Defect Type}) is used as the input for the first Computation.
1. Prepare the Computation Spreadsheet
Open the Spreadsheet associated with the first Computation.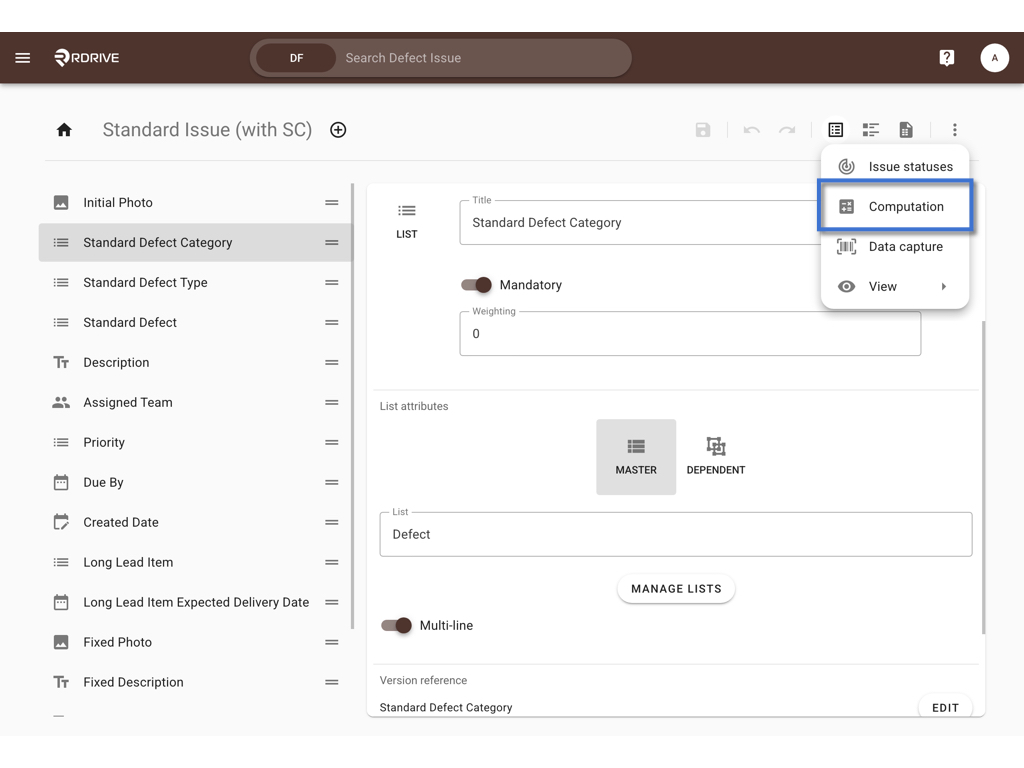
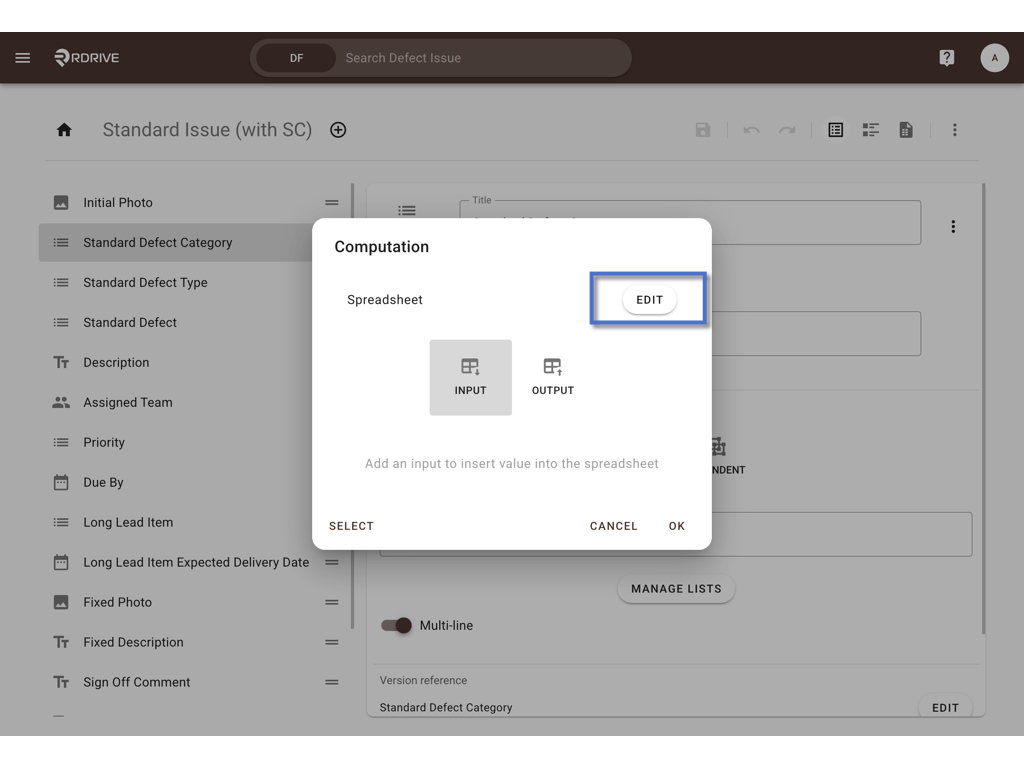
The Computation Spreadsheet contains four sheets:
| Sheet | Purpose |
|---|---|
RDrive_Teams | Provides the Team ID (Column A) and Team Name (Column D) used by RDrive |
RDrive_Lists | Provides the List items available for selection in the List field |
| Link team mapping | Maps each List item to the corresponding Team Name |
| Formula | Contains the Computation logic |
Add System Data —
RDrive_Teams
Open the Spreadsheet associated with the Computation and click Merge.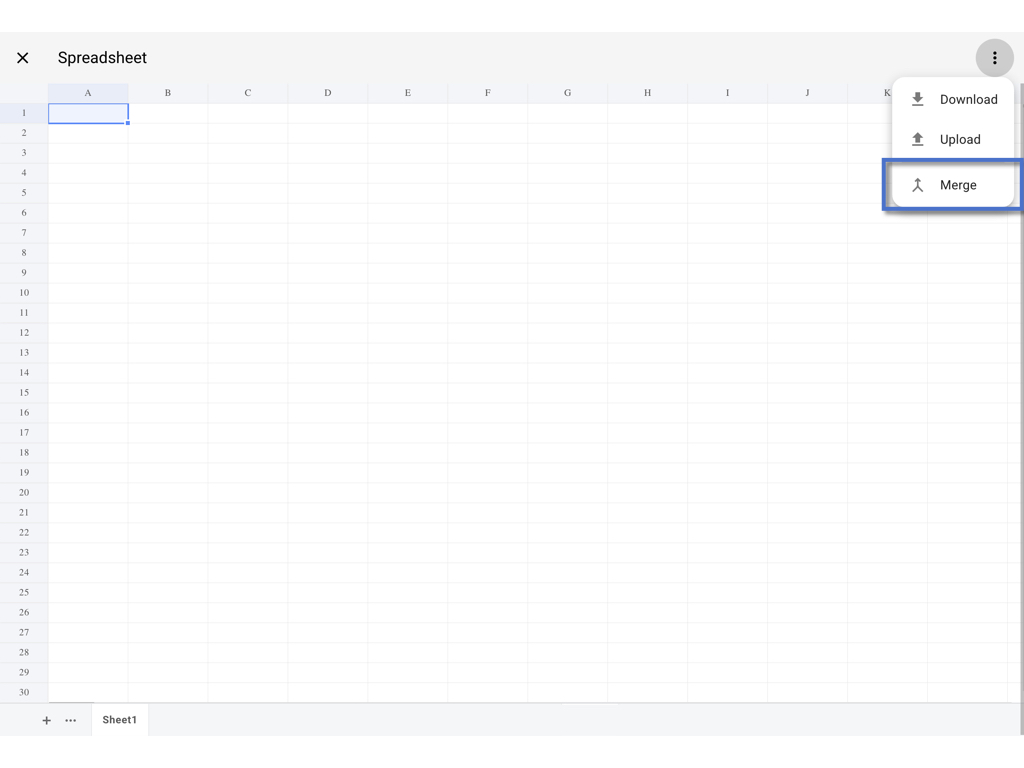
Add System Data to retrieve RDrive_Teams.
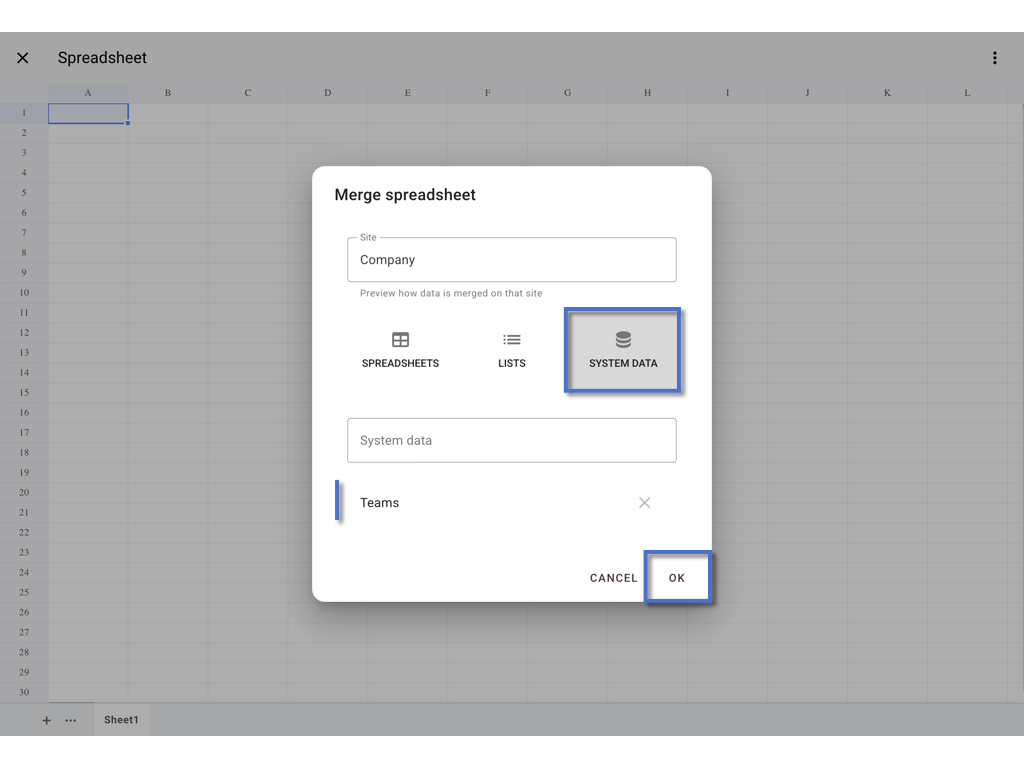
RDrive_Teams contains the Team ID and Team Name based on the selected Site.
For this example:
Select the Company level.
The Company level provides the most complete team information and includes teams from all projects.
RDrive_Teamsuses Column A for the Team ID and Column D for the Team Name.RDrive_Teamsis used as the system reference for retrieving the Team ID corresponding to a Team Name.
Add List Data —
RDrive_Lists
Add List Data for the List assigned to the List field.
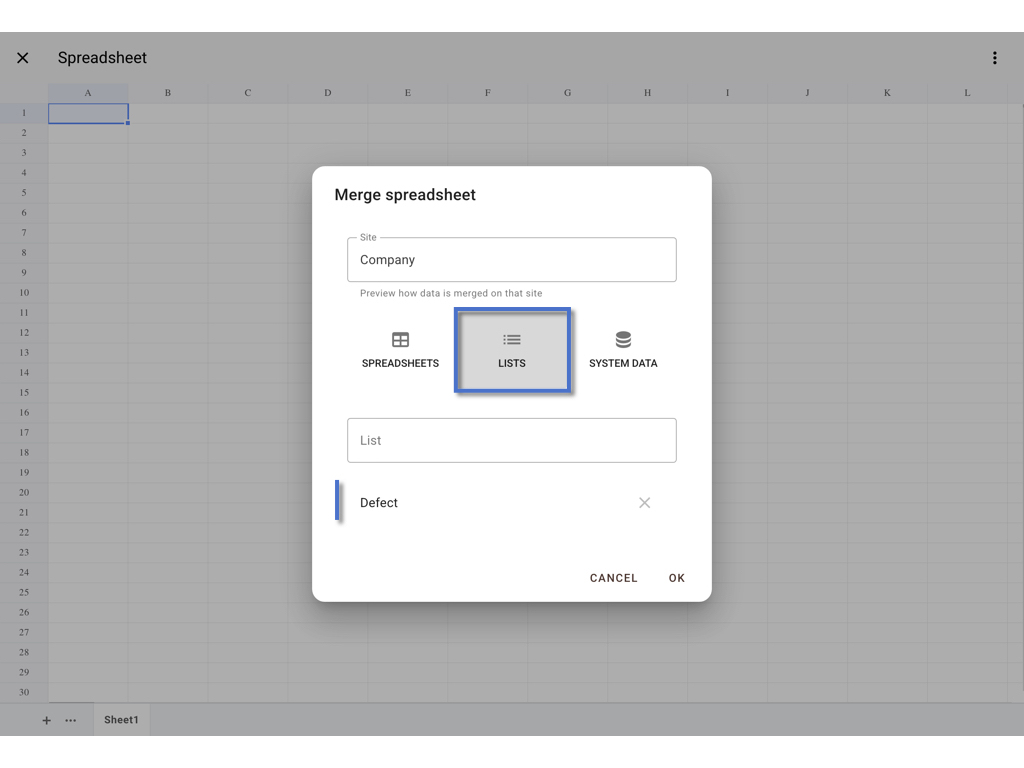 Make sure you select the same List that is assigned to the List fields. The merged data will be available in the
 RDrive_Lists sheet and provides the List items used for the team mapping.
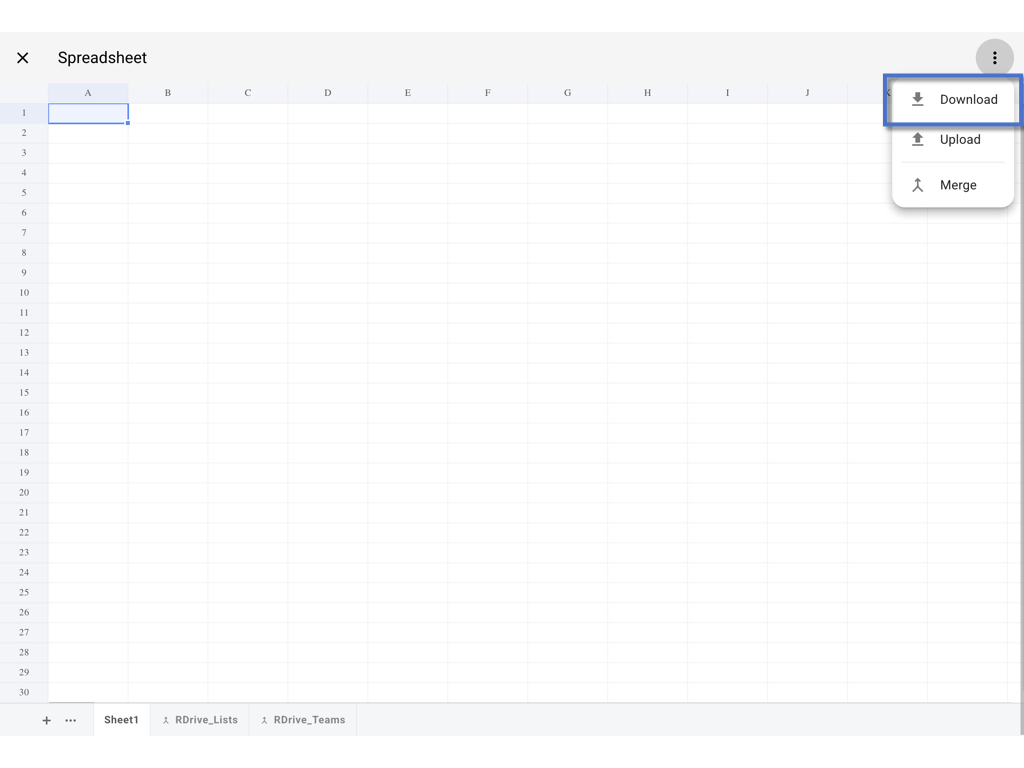
After adding the two data sources, the Spreadsheet will contain:
RDrive_TeamsRDrive_Lists
Download the Spreadsheet to continue configuring the remaining sheets.
2. Create the Link team mapping Sheet
After download, create a Link team mapping sheet to define which team should be assigned to each List item.
The sheet only needs the following two columns:
| List Item | Team Name |
|---|---|
| Architectural | Architectural Team |
| Civil | Civil Team |
| Electrical | Electrical Team |
| Mechanical | Mechanical Team |
Project Admins or authorized users can add or edit the mappings when the team assignment requirements change.
Important: There is no need to add or manually maintain Team IDs in the Team Mapping sheet. Users only need to maintain the List Item and Team Name. The Computation automatically retrieves the corresponding Team ID from
RDrive_Teams.
This means Project Admins and users do not need to know or manage internal Team IDs.
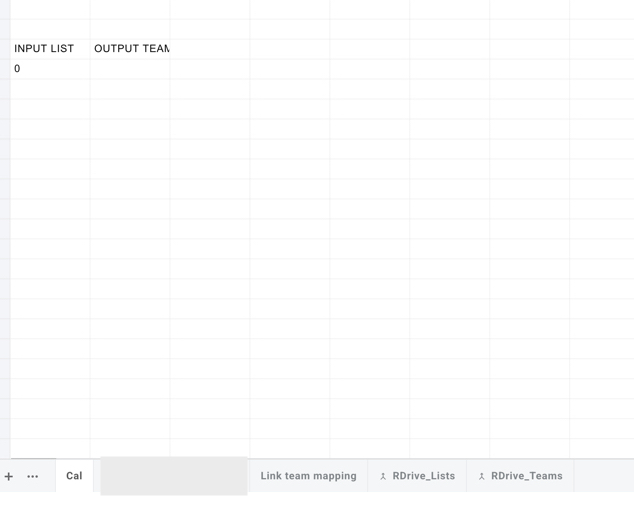
3. Set Up the Formula
Create a Cal sheet and configure the Computation as follows:
INPUT LIST | OUTPUT TEAM |
| {Standard Defect Type} | {Assigned Team} |
The formula should:
- Read the value selected in {Standard Defect Type}.
- Find the corresponding List Item in Column A of the Link team mapping sheet and retrieve the Team Name from Column B.
- Find the matching Team Name in
RDrive_TeamsColumn D. - Retrieve the corresponding Team ID from
RDrive_TeamsColumn A. - Return the Team ID as the output for the Assigned Team field.
Formula:
=IFERROR(INDEX(RDrive_Teams!A:A,MATCH(INDEX('Link team mapping'!B:B,MATCH(A2,'Link team mapping'!A:A,0)),RDrive_Teams!D:D,0)),"")In this example, A2 represents the cell containing the {Standard Defect Type} / List 2 input. Replace A2 with the actual input cell used in the Computation Spreadsheet.
How the Computation works
When a user selects a value in List 2 ({Standard Defect Type}):
Step 1: The Computation finds the selected value in Column A of the Link team mapping sheet.
Step 2: It gets the corresponding Team Name from Column B.
Step 3: It finds that Team Name in Column D of RDrive_Teams.
Step 4: It gets the corresponding Team ID from Column A of RDrive_Teams.
Step 5: The Team ID is returned to the Assigned Team field.
Example:
Electrical
↓
Link team mapping — Column AElectrical
↓
Link team mapping — Column BElectrical Team
↓
RDrive_Teams — Column DElectrical Team
↓
RDrive_Teams — Column ATEAM_ID_003
↓
Assigned Team
TEAM_ID_003
The Team ID is used internally by RDrive to identify the team. The Team field displays the corresponding Team Name to the user.
✅ Step 3: Set Up Computation 2 — Created Date + Priority to Due By Date
The second Computation calculates the Due By Date based on the Created Date and the number of days assigned to the selected Priority.
In this example, the Priority options and their corresponding number of days are managed separately:
The Priority List defines the Priority options available for selection in the List field.
The Preset Spreadsheet defines the number of days assigned to each Priority.
This separation allows Project Admins to adjust both the available Priority options and their corresponding calculation values at the project level.
1. Set Up the Priority List
Create a Priority List for the Priority field.
For example, the List may contain:
Low
Medium
High
Urgent
Emergency
The Priority List determines which options users can select in the Priority field.
Project Admins can add, remove, or modify List items at the project level when the project requirements change.
2. Prepare the Priority Mapping
Prepare a Priority List sheet for the mapping that will be added to the project’s Preset Spreadsheet in Step 4.
The sheet defines the number of days associated with each Priority.
For example:
| Priority | Days |
|---|---|
| Low | 14 |
| Medium | 5 |
| High | 7 |
| Urgent | 3 |
| Emergency | 1 |
The Days value determines how many days are added to the Created Date to calculate the Due By Date.
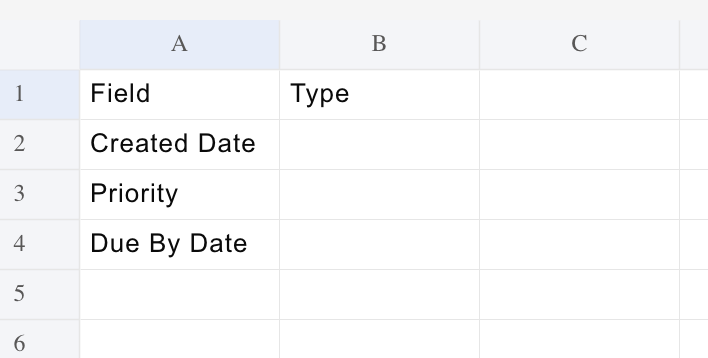
3. Set Up the Calculation
Configure the fields for the second Computation as follows:
| Field | Type |
|---|---|
| Created Date | Input |
| Priority | Input |
| Due By Date | Output |
The Calculation should perform the following steps:
Read the Priority selected by the user.
Find the selected Priority in the Priority List sheet in the Preset Spreadsheet.
Retrieve the corresponding Days value.
Read the Created Date.
Add the Days value to the Created Date.
Return the calculated date as the Due By Date.
Formula:
=IFERROR(B2+INDEX('Priority List'!B:B,MATCH(B3,'Priority List
'!A:A,0)),"")
In this example, B2 represents the numeric value of the Created Date, and B3 represents the Priority input. Replace these cell references with the actual cells used in the Computation Spreadsheet.
The Computation uses the selected Priority to find the corresponding number of Days in the Priority Mapping sheet of the Preset Spreadsheet. It then adds those Days to the Created Date to calculate the Due By Date.
How the Computation Works
When a user selects a Priority:
Step 1: The Computation finds the selected Priority in the Priority Mapping sheet.
Step 2: It gets the corresponding number of Days.
Step 3: It reads the Created Date.
Step 4: It adds the corresponding number of Days to the Created Date.
Step 5: The calculated date is returned to the Due By Date field.
Example:
High
↓
Priority Mapping — PriorityHigh
↓
Priority Mapping — Days7 days
↓
Created Date + 7 daysDue By Date
↓
Due By DateCalculated date
Important: In the Computation Spreadsheet, the Created Date is represented as a numeric date value. The Calculation uses this numeric value when adding the number of days.
Preset List and Preset Spreadsheet
The Preset List and Preset Spreadsheet serve different purposes:
Configuration | Purpose |
|---|---|
Preset List | Defines the options available for selection in a List field |
Preset Spreadsheet | Defines the mapping or calculation values associated with those options |
For example, the Priority List determines whether Low, Medium, High, Urgent, Emergency, or a newly added Priority such as Critical is available for selection. The Preset Spreadsheet then defines how many days each Priority represents.
This approach can also be used for other project-level configurations, such as Contractor, Defect List, and Assigned Team mappings. The Preset List provides the selectable options, while the Preset Spreadsheet provides the mapping or supporting data used by the Computation.
✅ Step 4: Add the Mapping Sheets to the Preset Spreadsheet
Add the required mapping sheets to the project’s Preset Spreadsheet.
The Preset Spreadsheet should contain the following mapping sheets:
Link team mapping — maps each List item to the corresponding Team Name.
Priority List — maps each Priority to the corresponding number of days.
Maintaining these mappings in the Preset Spreadsheet allows the mapping data to be updated at the project level. Project Admins or authorized users can update the mappings when project requirements change.
Add the Mapping Sheets
Go to Presets page
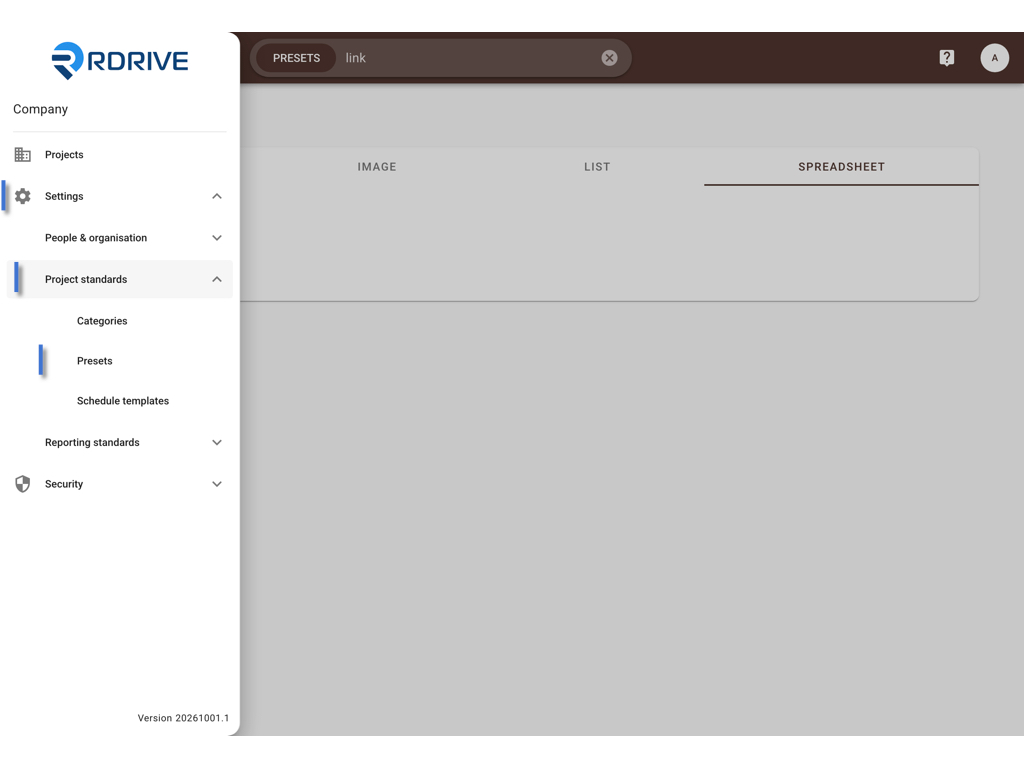
Add the Link team mapping sheet to the Preset Spreadsheet.
Add the Priority List sheet to the Preset Spreadsheet.
Save the Preset Spreadsheet.
Return to the Issue template.
Open the Computation Spreadsheet.
Click Merge.
Select the updated Preset Spreadsheet.
Merge the Preset Spreadsheet into the Computation Spreadsheet.
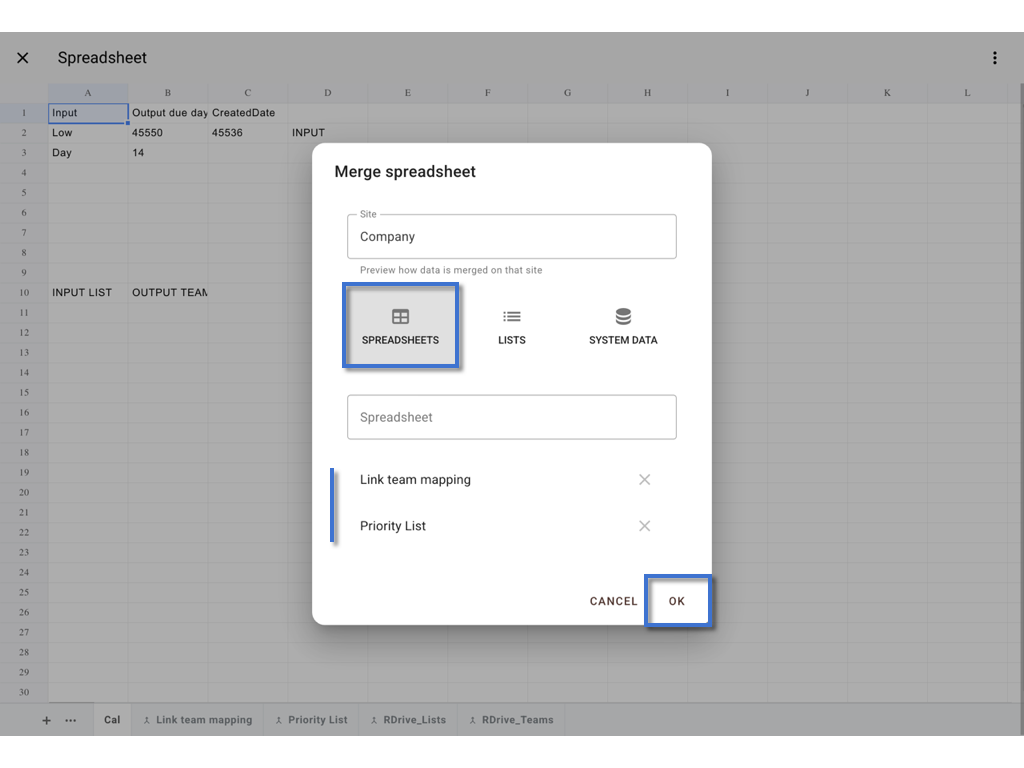
Confirm that both Link team mapping and Priority List are available to the Computations.
The Computations can now use the project-level mapping data, while the Team IDs continue to be retrieved automatically from RDrive_Teams.
Important: Project Admins and users only need to maintain the List Item and Team Name for team mapping, and the Priority and Days values for Priority mapping. They do not need to know or manage internal Team IDs.
Example: Adding a New Priority
If a project adds a new Critical Priority to the Priority List, add the corresponding mapping to the Priority List sheet:
| Priority | Days |
|---|---|
| Critical | 2 |
The new Priority can then be used by the Computation to calculate the Due By Date based on the configured number of days.

✅ Step 5: Map the Fields to Spreadsheet Cells
Map the Issue template fields to their corresponding cells in the Computation Spreadsheet.
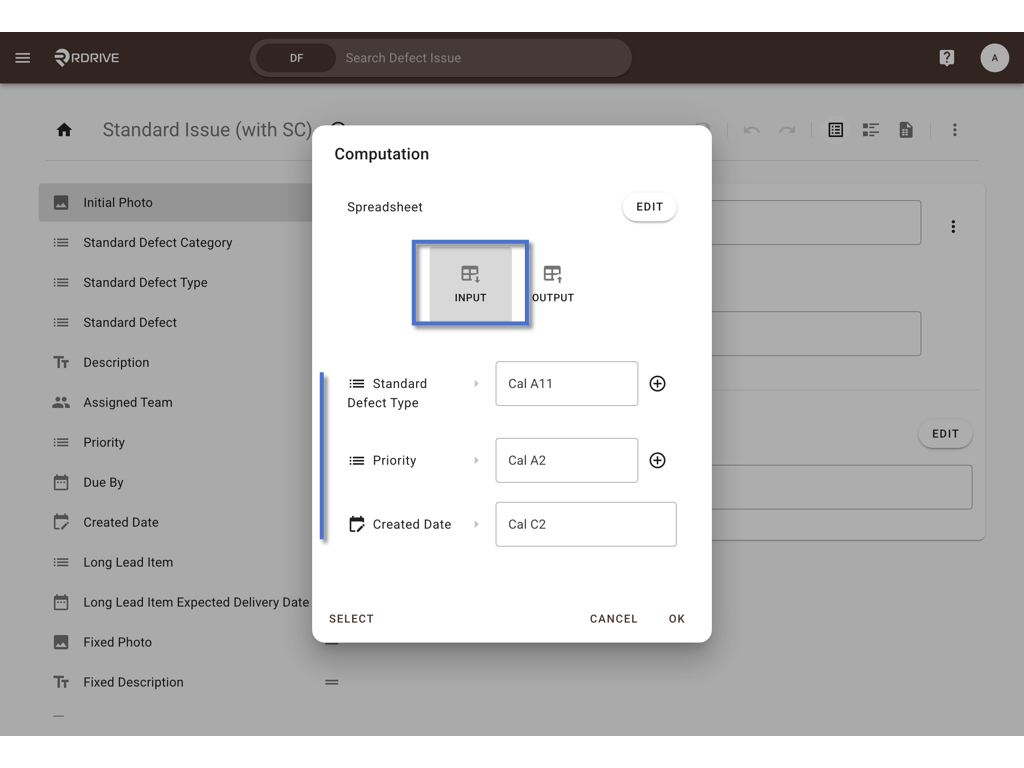
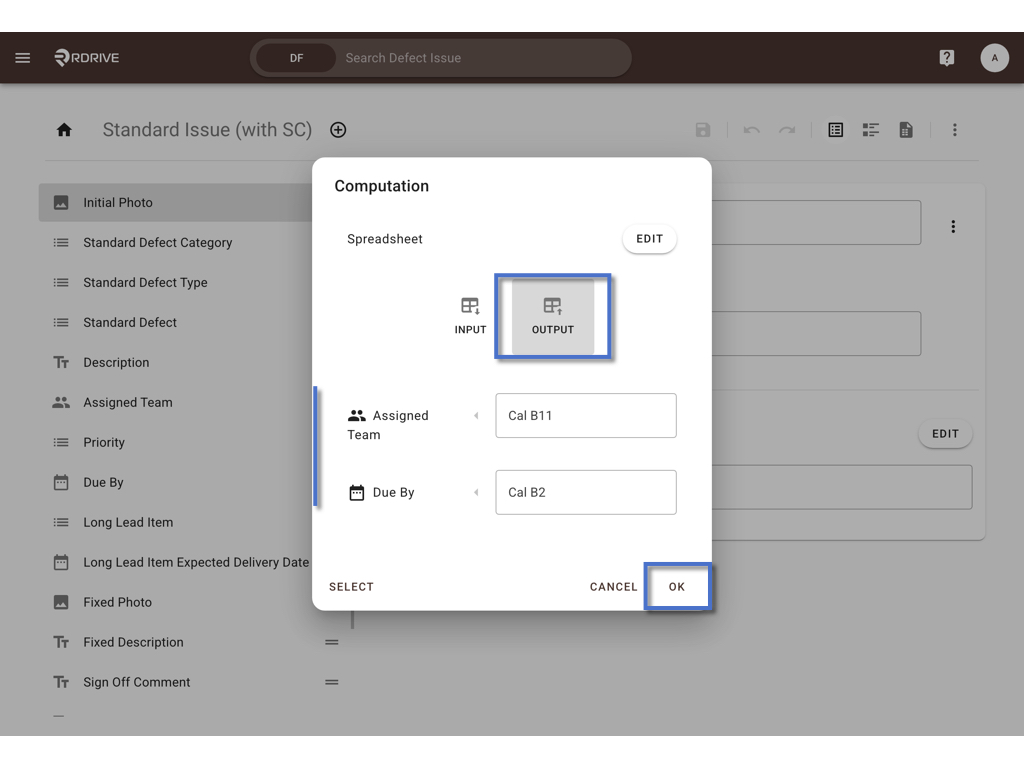
Click Select in the Computation dialogue, then select the cells for the required input and output fields.
For this Computation:
Input:
Standard Defect Type
Priority
Created Date
Output:
Assigned Team
Due By
Tip: Make sure each field is mapped to the correct spreadsheet cell before proceeding to the next step.
For detailed instructions, please refer to the following articles:
Preset Spreadsheet: Add and Merge with the Template (Company Level) — for instructions on adding and merging a Preset Spreadsheet with a template.
How to Edit a Preset Spreadsheet on the Project — for instructions on editing the Preset Spreadsheet at the project level.
✅ Step 6: Test the Computations
After completing the setup, test both Computations to make sure they return the expected results.
Test Computation 1 — Assigned Team
- Create or open a test record.
- Select a value in the {Standard Defect Type} field.
- Run the Computation.
- Check the Assigned Team field.
- Confirm that the correct Team Name is displayed.
For example:
| Standard Defect Type | Expected Assigned Team |
|---|---|
| Architectural | Architectural Team |
| Civil | Civil Team |
| Electrical | Electrical Team |
| Mechanical | Mechanical Team |
Also verify that the Computation retrieves the correct Team ID from RDrive_Teams.
Test Computation 2 — Due By Date
- Create or open a test record.
- Confirm the Created Date.
- Select a Priority.
- Run the Computation.
- Check the Due By Date.
- Confirm that the calculated date matches the expected result based on the Priority.
Test the Project-Level Mapping
To verify that the Preset Spreadsheet is working correctly:
- Update a List-to-Team mapping in the Preset Spreadsheet.
- Merge the updated Preset Spreadsheet back into the template.
- Create a test record using the updated List item.
- Run the Computation.
- Confirm that the Assigned Team reflects the updated mapping.
To test a new Priority:
- Add the new Priority to the Priority List.
- Add the corresponding Priority and Days values to the Priority List sheet.
- Merge the updated Preset Spreadsheet back into the template.
- Create a test record and select the new Priority.
- Run the Computation and confirm that the Due By Date is calculated correctly.
Tip: Test each List item and each Priority option to ensure that all mappings and calculations return the expected results.
Best Practices
- Keep List Values Consistent
Use clear and standardized values for the List fields. Since {Standard Defect Type} is used as an input for the team assignment, make sure each relevant value has a corresponding team. - Define Inputs and Outputs Clearly
Before configuring each Computation, identify which fields provide information to the Spreadsheet and which fields should receive the calculated results.
Computation 1
Input: {Standard Defect Type}
Output: Assigned Team
Computation 2
Inputs: Created Date, Priority
Output: Due By Date
Keep Field-to-Cell Mapping Consistent
Make sure each field is assigned to the correct Spreadsheet cell and that the formula references the intended cells.
Changing a field-to-cell mapping without updating the formula may cause the Computation to return an incorrect result.
- Test All Relevant Values
When a new {Standard Defect Type} value or Priority option is added, update the corresponding mapping in the Preset Spreadsheet and test the Computation.
The formula normally does not need to be changed when a new value is added, as long as the mapping structure remains the same. Test the relevant combinations before publishing the updated template.
FAQs & Troubleshooting
Q: Why is the Assigned Team not populated after selecting List 2?
A: Check that List 2 is correctly configured as the Computation input and that it is mapped to the correct Spreadsheet cell. Also verify that the selected List 2 value has a corresponding entry in the Link team mapping sheet and that the Team Name matches a Team Name in RDrive_Teams Column D.
Q: Why is the Due By Date not calculated?
A: Check that both Created Date and Priority are correctly configured as Computation inputs and mapped to the correct Spreadsheet cells. Also verify that the selected Priority has a corresponding entry in the Priority List sheet and that the Days value is valid.
Q: What happens if a new List 2 option is added?
A: Add the new List 2 option to the relevant List, then add the corresponding List Item and Team Name to the Link team mapping sheet in the Preset Spreadsheet. Merge the updated Preset Spreadsheet back into the template if required. The formula normally does not need to change as long as the mapping structure remains the same.
Q: What happens if a new Priority option is added?
A: Add the new Priority to the Priority List and add the corresponding Priority and Days values to the Priority List sheet in the Preset Spreadsheet. Then merge the updated Preset Spreadsheet back into the template if required. The formula normally does not need to change as long as the mapping structure remains the same.
Q: Can different List 2 values return the same team?
A: Yes. Multiple List 2 values can be configured to return the same Assigned Team when they are handled by the same team.
Q: Do I need to maintain Team IDs in the mapping sheet?
A: No. The Link team mapping sheet only requires the List Item and Team Name. The Computation automatically retrieves the corresponding Team ID from RDrive_Teams Column A by matching the Team Name in Column D.
Q: What is the difference between a Preset List and a Preset Spreadsheet?
A: A Preset List defines the selectable options available in a List field. A Preset Spreadsheet stores mapping or supporting data used by a Computation, such as List-to-Team mappings or Priority-to-Days mappings.
Q: What should I check if a Computation returns an incorrect result?
A: Check the following:
The correct fields are configured as Inputs and Outputs.
Each field is assigned to the correct Spreadsheet cell.
The formula references the correct cells.
The input values match the conditions defined in the formula.
The Link team mapping or Priority List contains the required mapping.
The expected output is correctly configured in the Spreadsheet.
Template
A sample Issue template is attached to this article for your reference.
The attached file was last updated on 7 October 2026.
Was this article helpful?
That’s Great!
Thank you for your feedback
Sorry! We couldn't be helpful
Thank you for your feedback
Feedback sent
We appreciate your effort and will try to fix the article